Red Velvet Cake – A Beautiful Mess

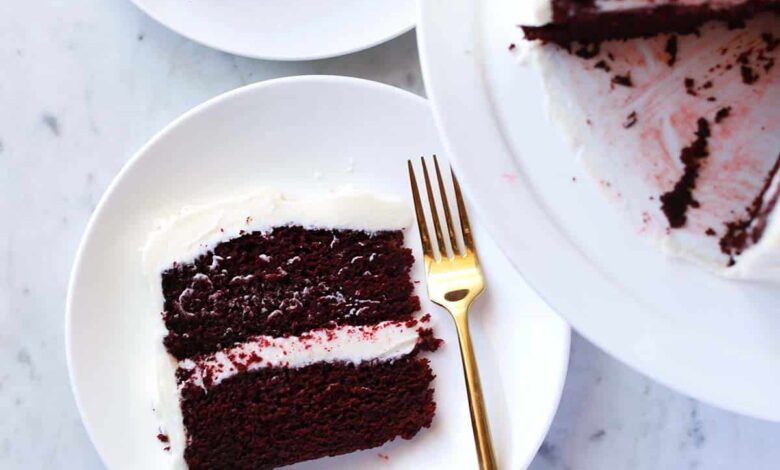
Earlier this week, I made this red velvet cake for my 39th birthday. I brought it to my book club, which happened to be meeting that evening, and it was devoured. And yes, I made them sing so I could blow out candles and make a wish. I am shameless! The truth is I’ve been making this red velvet cake recipe for nearly two decades now. This is the recipe I used back when we had a local store with a sweet shop stocked with cupcakes inside. IMHO, it is the best red velvet cake recipe!
What I love about this red velvet cake is it is super, and I mean super, moist. The cake is soft and spongy, lightly chocolate and stained a deep red. The cream cheese frosting is creamy, decadent, but not too sweet. And what’s kind of interesting about this red velvet cake recipe is it doesn’t contain any buttermilk, or milk, or eggs or even butter. The cake happens to be dairy free and made with all-purpose flour. So even the most casual baker likely has all the ingredients needed on hand. The cream cheese frosting is absolutely NOT dairy-free, but it is simple with only five ingredients. So, if you are looking for an easy red velvet cake with cream cheese frosting that doesn’t compromise on flavor or texture, this is it!
Related: If you love this recipe, next up, try red velvet cookies or pumpkin cake with cream cheese frosting.

Ingredients
- All-purpose flour
- Granulated white sugar
- Cocoa powder
- Baking soda
- Salt
- Vanilla extract
- Canola oil
- White vinegar
- Water
- Red food coloring – I like to use gel food dye
- Cream cheese
- Unsalted butter
- Powdered sugar – also called confectioner’s sugar
- Salt

Instructions
For the cake, whisk together the dry ingredients: flour, sugar, cocoa, baking soda and salt. Then stir in the wet ingredients: vanilla, oil, vinegar and water. This will make a very wet cake batter. Last, stir in the red food coloring.
Prepare the baking pans. I add parchment paper to the bottoms and then spray well around the edges with nonstick cooking spray. Pour the batter into the pans, dividing it evenly. Place the pan on a baking sheet, to make them easier to move, and bake at 350°F for 30 minutes. To check if they are done, insert a toothpick to the center of the cake. If it comes out clean (no wet batter attached), it’s done. Allow the cakes to cool in the pans before removing.
To make the frosting, start with softened (room temperature) cream cheese and butter. I usually set mine out (in the package) the night before on my kitchen counter. In a stand mixer with the paddle attachment or large bowl with an electric hand mixer, whip together the cream cheese and butter until smooth. Then mix in the vanilla extract. Then add the powdered sugar a cup at a time, mixing in between (or with a stand mixer running on low) until the frosting comes together. Scrape down the sides of the bowl with a rubber spatula to make sure all the sugar is getting incorporated well. Add the salt with the last of the powdered sugar.
Remove the cakes from the pan. I usually run a knife along the edges between the cake and pan to make sure they are loosened. Then I invert them onto a cooling rack. Assemble your cake with a thick layer of frosting between the cake layers and on top. I like to use an offset spatula to frost a cake. You will have plenty of frosting if you want to frost the sides as well.

Tips and Notes
- Instead of canola oil you could use vegetable oil or any other flavorless or light flavored cooking oil.
- If you don’t want to use red dye, you could try something natural like powdered (dehydrated) raspberries, cranberries or beets. While I don’t necessary want red food dye in my food most of the time, I tend to make an exception for a cake I only eat once or twice a year, but that’s just me.
- I baked this cake in two 8-inch round cake pans at 350°F for 30 minutes. If you use two 9-inch round pans, you may want to reduce the bake time to around 25-27 minutes. If you bake this recipe in a large cupcake pan, you may want to reduce the bake time to 22-24 minutes. The toothpick test is the way to go to ensure they are done!
- If you do make this recipe into red velvet cupcakes, I would recommend cutting the frosting recipe in half or maybe 2/3. It makes plenty of frosting for a cake but too much for cupcakes, IMO. (And I like a lot of frosting, for the record.)
- You can store leftover red velvet cake in an airtight container in the fridge for at least 3 days. I do recommend refrigerating once the cake is frosted as the cream cheese frosting does, of course, contain dairy.

More Cake and Dessert Recipes

Get our FREE recipe guide with our most popular recipes of all time!

Free Popular Recipe Guide
Our top 25 recipes of all time!
Get the Recipe
A super moist and spongy cake with cream cheese frosting.
Instructions
-
For the cake, whisk together the dry ingredients: flour, sugar, cocoa, baking soda and salt.
-
Then stir in the wet ingredients: vanilla, oil, vinegar and water. This will make a very wet cake batter. Last, stir in the red food coloring.
-
Prepare the baking pans. I add parchment paper to the bottoms and then spray well around the edges with nonstick cooking spray.
-
Pour the batter into the pans, dividing it evenly. Place the pan on a baking sheet, to make them easier to move, and bake at 350°F for 30 minutes.
-
To check if they are done, insert a toothpick to the center of the cake. If it comes out clean (no wet batter attached), it’s done. Allow the cakes to cool in the pans before removing.
-
To make the frosting, start with softened (room temperature) cream cheese and butter. I usually set mine out (in the package) the night before on my kitchen counter.
-
In a stand mixer with the paddle attachment or large bowl with an electric hand mixer, whip together the cream cheese and butter until smooth.
-
Then mix in the vanilla extract.
-
Then add the powdered sugar a cup at a time, mixing in between (or with a stand mixer running on low) until the frosting comes together. Scrape down the sides of the bowl with a rubber spatula to make sure all the sugar is getting incorporated well.
-
Add the salt with the last of the powdered sugar.
-
Remove the cakes from the pan. I usually run a knife along the edges between the cake and pan to make sure they are loosened. Then I invert them onto a cooling rack.
-
Assemble your cake with a thick layer of frosting between the cake layers and on top. I like to use an offset spatula to frost a cake. You will have plenty of frosting if you want to frost the sides as well.
Notes
- Instead of canola oil, you could use vegetable oil or any other flavorless or light flavored cooking oil.
- If you don’t want to use red dye, you could try something natural like powdered (dehydrated) raspberries, cranberries or beets. While I don’t necessary want red food dye in my food most of the time, I tend to make an exception for a cake I only eat once or twice a year, but that’s just me.
- I baked this cake in two 8-inch round cake pans at 350°F for 30 minutes. If you use two 9-inch round pans, you may want to reduce the bake time to around 25-27 minutes. If you bake this recipe in a large cupcake pan, you may want to reduce the bake time to 22-24 minutes. The toothpick test is the way to go to ensure they are done!
- If you do make this recipe into red velvet cupcakes I would recommend cutting the frosting recipe in half or maybe 2/3. It makes plenty of frosting for a cake but too much for cupcakes, IMO. (And I like a lot of frosting, for the record.)
- You can store leftover red velvet cake in an airtight container in the fridge for at least 3 days. I do recommend refrigerating once the cake is frosted as the cream cheese frosting does, of course, contain dairy.
Nutrition
Nutrition Facts
Red Velvet Cake
Amount per Serving
% Daily Value*
* Percent Daily Values are based on a 2000 calorie diet.
Notice: Nutrition is auto-calculated, using Spoonacular, for your convenience. Where relevant, we recommend using your own nutrition calculations.
https://abeautifulmess.com/wp-content/uploads/2025/01/red-velvet-cake.jpg
2025-01-24 08:00:00


