
Master Web Socket Implementation for Real-Time Flutter Apps

Real-time communication has become a cornerstone of modern applications in today’s fast-paced digital world. Users expect seamless, instantaneous updates, Whether live chat, instant notifications, or collaborative tools.
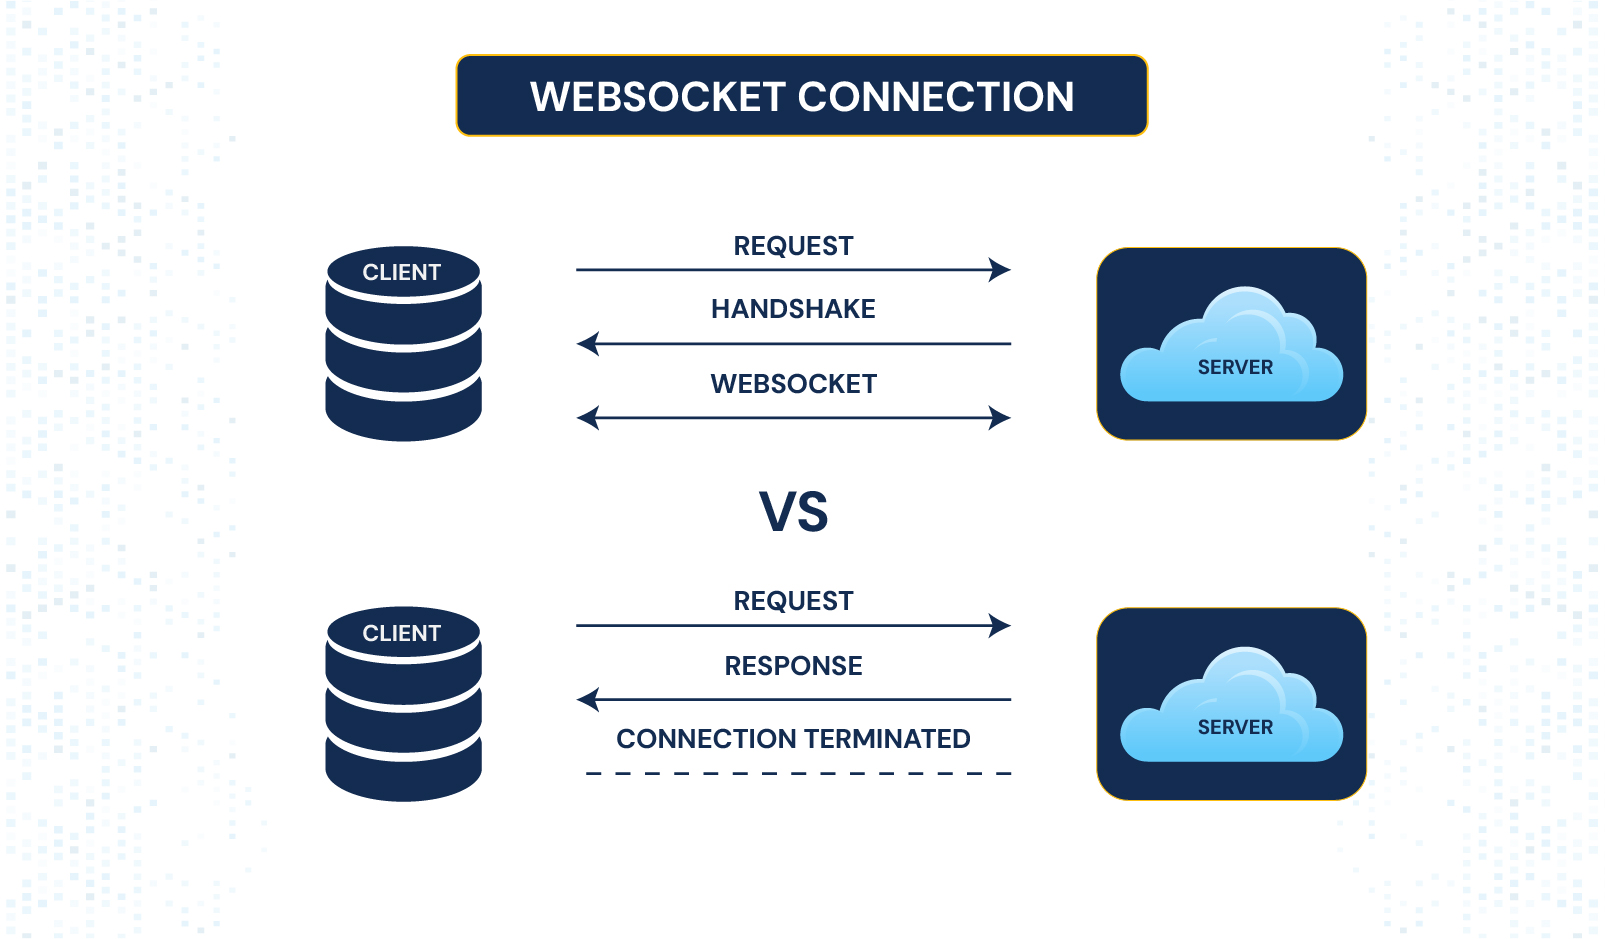
This is where WebSockets come into play. Unlike traditional HTTP requests, WebSockets establish a persistent, bidirectional connection between the client and server, enabling real-time data exchange with minimal latency.
Implementing WebSockets opens exciting opportunities for Flutter developers to create dynamic and engaging user experiences.
In this blog, we’ll explore how to set up and use WebSockets in Flutter app development, from establishing connections to handling data streams and ensuring your app stays responsive and up to date.
Understanding WebSockets
What are WebSockets?
WebSockets are a communication protocol that enables real-time, bidirectional communication between a client and a server over a single, persistent connection.
Unlike HTTP, which is request-response based and closes after each interaction, WebSockets remain open, allowing continuous data exchange without reestablishing the connection.
Advantages of WebSockets:
- Reduced Latency: Faster data transfer as the connection remains open.
- Persistent Connection: No need to repeatedly reconnect for new data.
- Efficient Communication: Suitable for real-time applications with high data exchange.
Use Cases in Flutter:
- Real-time Chat Applications: Instant message delivery and receipt.
- Stock Market or Sports Updates: Live updates for dynamic data.
- Multiplayer Gaming: Synchronizing game states among players in real-time.
Setting Up WebSocket in Flutter App Development
Prerequisites
Before diving into WebSocket implementation, ensure you have:
- A basic understanding of Flutter and Dart.
- Knowledge of setting up a WebSocket server using a backend technology like Node.js, Python, or any WebSocket-supporting framework. This server will handle incoming connections and process messages.
Adding Dependencies
We’ll utilize the web_socket_channel package to use WebSockets in Flutter, simplifying WebSocket communication. Add the package to your pubspec.yaml file:
dependencies:
flutter:
sdk: flutter
web_socket_channel: ^2.3.0
Run the “flutter pub get” to get the dependencies.
This package provides an easy-to-use API for establishing WebSocket connections and handling data streams in Flutter apps.
Setting Up the Client-Side Code
To implement WebSockets in Flutter, you need to establish a connection, send messages, and listen for responses. Here’s an example:
//main.dart
import ‘package:web_socket_channel/web_socket_channel.dart’;
void main()
final channel = WebSocketChannel.connect(
Uri.parse(‘wss://example.com/socket’),
);
channel.stream.listen((message)
print(‘Received: $message‘);
);
channel.sink.add(‘Hello, WebSocket!’);
Explanation of the Code:
Import the WebSocketChannel Package:
- This allows you to use WebSocket functionalities in your app.
Establish a Connection:
- WebSocketChannel.connect(Uri.parse(‘wss://example.com/socket’)): Connects to the WebSocket server at the specified URI. Replace ‘wss://example.com/socket’ with your WebSocket server URL.
Listening to Messages:
- channel.stream.listen((message) … ): Listens for incoming messages from the server. In this example, received messages are printed to the console.
Sending Messages:
- channel.sink.add(‘Hello, WebSocket!’): Sends a message to the WebSocket server.
Handling Data Streams in Flutter Widgets
To display WebSocket messages in your app, use Flutter’s StreamBuilder widget, which listens to data streams and updates the UI accordingly.
StreamBuilder(
stream: channel.stream,
builder: (context, snapshot)
if (snapshot.hasData)
return Text(‘Received: $snapshot.data‘);
else if (snapshot.hasError)
return Text(‘Error: $snapshot.error‘);
return CircularProgressIndicator();
,
);
Explanation of the Code:
Stream Connection:
- stream: channel.stream: Connects the StreamBuilder to the WebSocket stream to listen for incoming data.
Handling Data States:
- snapshot.hasData: Checks if there is data available. If yes, it displays the message.
- snapshot.hasError: Checks if there’s an error in the stream and displays an error message.
Loading State:
- By default, CircularProgressIndicator() is shown until data is received or an error occurs.
Securing WebSocket Connections
WebSocket connections, like any network communication, need to be secured to protect data and prevent unauthorized access. Here’s how to ensure secure WebSocket implementation:
Using wss:// for Secure Connections
- The wss:// protocol is the secure counterpart of ws://, much like HTTPS is to HTTP.
- It encrypts the WebSocket communication using SSL/TLS, ensuring data integrity and confidentiality during transmission.
- Always use wss:// in production environments, especially when sensitive data like user credentials, financial transactions, or personal information is involved.
/*
final channel = WebSocketChannel.connect(
Uri.parse(‘wss://secure-example.com/socket’),
);
*/
Server-Side Security Configurations
Clients must include an authentication token (e.g., JWT) in their WebSocket connection request headers or as a query parameter.
This ensures only authorized users can establish a connection.
final channel = WebSocketChannel.connect( Uri.parse(‘wss://secure-example.com/socket?token=yourAuthToken’), );
Configure the WebSocket server with a valid SSL/TLS certificate to enable encrypted communication.
Implement rate limiting to prevent denial-of-service (DoS) attacks caused by excessive connection requests.
Set timeouts for idle or inactive connections to reduce server load and mitigate risks from abandoned sessions.
- Cross-Origin Resource Sharing (CORS):
Restrict allowed origins on the server to prevent unauthorized access from untrusted sources.
Testing and Debugging
-
Using Tools for Testing:
- Postman: Test WebSocket connections by sending messages to your server and observing responses. Postman supports WebSocket testing under the “New” request type.
- Browser Developer Tools: Use the Network tab in developer tools to monitor WebSocket frames, messages, and connection details during flutter app development services.
-
Debugging in Flutter:
- Use debugPrint to log WebSocket messages and connection events:
channel.stream.listen((message)
debugPrint(‘Received: $message‘);
);
channel.sink.add(‘Hello WebSocket!’);
debugPrint(‘Message sent: Hello WebSocket!’);
-
Simulate Scenarios:
- Test different conditions like connection drops, invalid messages, and reconnection strategies to ensure robustness.
Efficient testing and logging make it easier to identify and resolve issues, improving the overall reliability of your WebSocket implementation.
Conclusion
WebSockets play a crucial role in building real-time applications by enabling fast, efficient, and persistent communication between clients and servers.
Whether you’re developing chat apps, live sports updates, or multiplayer games, WebSockets ensure a seamless user experience with minimal latency.
As a Flutter developer, mastering WebSocket implementation can unlock exciting possibilities for dynamic and interactive app features.
With the ease of integration and powerful tools available, incorporating WebSockets into your Flutter app development projects is a rewarding step toward creating responsive and engaging applications.
If you need further help in Flutter app development, you can contact us at [email protected] . We will schedule a free consultation session to explore how Xavor can assist you.
https://www.xavor.com/wp-content/uploads/2025/02/Mastering-Web-Socket-Implementation-in-Flutter-App-Development.jpg
2025-02-19 05:04:42