


I love homemade focaccia bread. Like, LOVE! I use it to dip in soups, cut in half for sandwich bread, toasted as croutons for salad or on its own for a carb-forward snack. 🙂 I am obsessed with the soft, pillowy crumb interior and the crispy, flavorful crust. And this is THE focaccia bread recipe I use at home all the time. It’s simple and easy to make, although it does require some time. It’s worth it!
If you are intimidated by bread baking, I get it! IMO focaccia is one of the easiest homemade breads to make. The dough recipe requires only five ingredients, you don’t need any special equipment or pans (no stand mixer! no dough hook!) and you don’t even need to know how to knead bread dough.
Related: Love homemade breads? Next up, try Yorkshire pudding or pretzel bread bowls for soup!

Ingredients
- Active dry yeast
- Water
- Granulated white sugar
- All-purpose flour
- Kosher salt
- Extra-virgin olive oil
- Butter
You will also want some additional ingredients to top the bread before baking. I like fresh rosemary, flaky sea salt, garlic powder, Lawry’s seasoning salt, and onion powder. I’ve included the ratios I use in the recipe card below, but you can switch up what you top your focaccia with!

How to make focaccia
In a large glass measuring cup (or a small to medium mixing bowl), stir the sugar into the warm water. Sprinkle the yeast over the top, it should start to foam a little within a minute or two. If it doesn’t, check the expiration date and if needed start over with fresh yeast.
In a large bowl, add the flour and salt. Pour in the water and yeast mixture and stir until a shaggy dough ball forms. If needed, use your hands to form any remaining flour or pieces together into a dough ball. Add a little oil under the dough ball. Then cover the bowl with plastic wrap and refrigerate for 12-24 hours.
Prepare the 9×13-inch baking pan. Rub the softened butter all along the bottom, corners and up the sides of the pan. Then drizzle half of the olive oil on the bottom.
Remove the dough from the refrigerator and turn it out of the bowl onto a lightly floured surface. Use your hands to fold the four corners (or four opposite edges, it likely won’t resemble a square necessarily) in on themselves. Then place the dough in the prepared baking pan. Cover and allow to rise in a warm spot for 2 hours.
Drizzle the rest of the oil over the top of the dough and use your fingertips to dimple the dough, lightly pressing it out so it fills the entire pan. Top with fresh herbs, salt and any other seasonings you like. Bake in the oven at 425°F for 25-28 minutes. The tops of the bubbles should look a deep golden brown.

Tips and Notes
- If your kitchen isn’t warm, then I recommend preheating your oven for a few minutes then turning it off and tucking the dough pan inside for the second rise. If you do this, keep in mind you don’t want the oven so warm that the dough begins to bake. But if your kitchen is drafty in the winter like mine is, this may be necessary so that second rise can happen in a warm area.
- Rise times—stick to what I recommend for best results. I know, it’s a long rise in the fridge. I usually make the dough at night and refrigerate overnight so I can do the second rise and bake the next day. The long rise adds a lot of flavor, but if you can’t wait that long, you can skip the refrigerator and let the dough rise for the first rise in a warm spot (covered) for 3 hours. Second rise is the same.
- You can top this focaccia recipe so many ways! Maybe you’ve seen people add olives, sun-dried tomatoes, cherry tomatoes, sliced tomatoes or almost create a kind of scene in focaccia before baking. If you want to go that route, do it! Other fresh herbs I sometimes use include thyme, sage, dill or basil. You could also add some powdery Parmesan cheese or shredded cheddar cheese. There are so many focaccia topping options that can alter this basic recipe.

Our Favorite Soup Recipes
I love fresh focaccia bread alongside homemade soup.
Frequently Asked Questions
What is the difference between active dry yeast and instant yeast?
Active dry yeast needs to be activated by adding to warm water before using in a recipe, while instant yeast can be added directly into the dry or wet ingredients.

Get our FREE recipe guide with our most popular recipes of all time!


Free Popular Recipe Guide
Our top 25 recipes of all time!

Get the Recipe

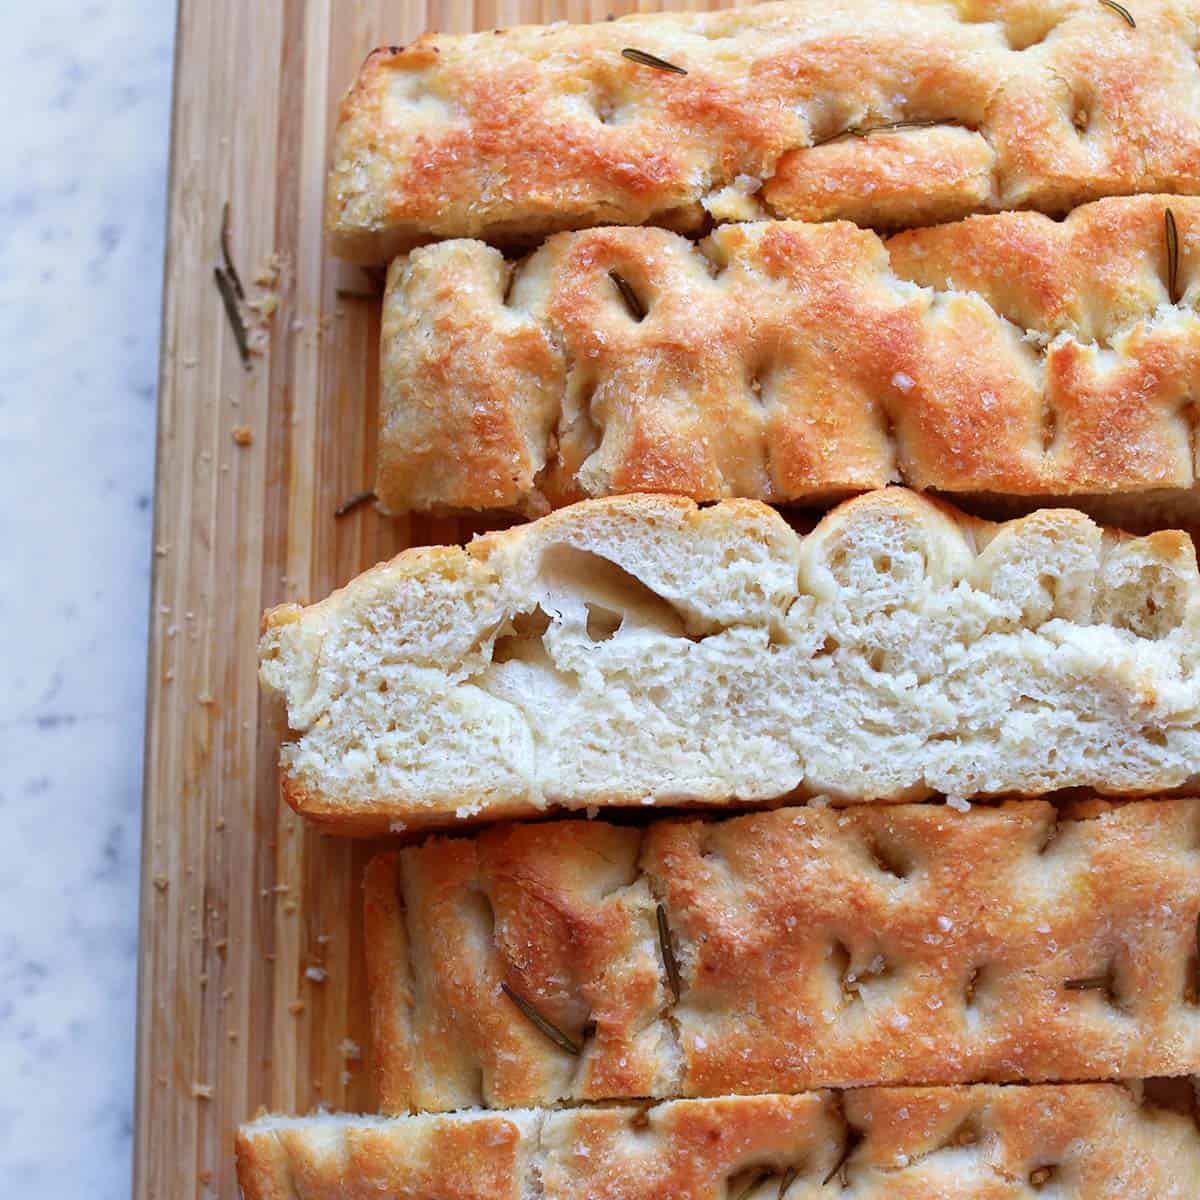
Soft and pillowy interior with a crispy, buttery crust. The best homemade bread!
Instructions
-
In a large glass measuring cup (or a small to medium mixing bowl), stir the sugar into the warm water.
-
Sprinkle the yeast over the top, it should start to foam a little within a minute or two. If it doesn’t, check the expiration date and if needed start over with fresh yeast.
-
In a large bowl, add the flour and salt. Pour in the water and yeast mixture and stir until a shaggy dough ball forms. If needed, use your hands to add any remaining flour or pieces together into a dough ball.
-
Add a little oil under the dough ball. Then cover the bowl with plastic wrap and refrigerate for 12-24 hours.
-
Prepare the 9×13-inch baking pan. Rub the softened butter all along the bottom, corners and up the sides of the pan. Then drizzle half of the olive oil on the bottom.
-
Remove the dough from the refrigerator and turn it out of the bowl onto a lightly floured surface. Use your hands to fold the four corners (or four opposite edges, it likely won’t resemble a square necessarily) in on themselves.
-
Then place the dough in the prepared baking pan. Cover and allow to rise in a warm spot for 2 hours.
-
Drizzle the rest of the oil over the top of the dough and use your fingertips to dimple the dough, lightly pressing it out so it fills the entire pan. Top with fresh herbs, salt and any other seasonings you like.
-
Bake in the oven at 425°F for 25-28 minutes. The tops of the bubbles should look a deep golden brown.
Notes
- If your kitchen isn’t warm, then I recommend preheating your oven for a few minutes then turning it off and tucking the dough pan inside for the second rise. If you do this, keep in mind you don’t want the oven so warm that the dough begins to bake. But if your kitchen is drafty in the winter like mine is, this may be necessary so that second rise can happen in a warm area.
- Rise times—stick to what I recommend for best results. I know, it’s a long rise in the fridge. I usually make the dough at night and refrigerate overnight so I can do the second rise and bake the next day. The long rise adds a lot of flavor, but if you can’t wait that long you can skip the refrigerator and let the dough rise for the first rise in a warm spot (covered) for 3 hours. Second rise is the same.
- You can top this focaccia recipe so many ways! Maybe you’ve seen people add olives, sun-dried tomatoes, cherry tomatoes, sliced tomatoes or almost create a kind of scene in focaccia before baking. If you want to go that route, do it! Other fresh herbs I sometimes use include thyme, sage, dill or basil. You could also add some powdery Parmesan cheese or shredded cheddar cheese. There are so many focaccia toppings options that can alter this basic recipe.
Nutrition
Nutrition Facts
Focaccia
Amount per Serving
% Daily Value*
* Percent Daily Values are based on a 2000 calorie diet.
Notice: Nutrition is auto-calculated, using Spoonacular, for your convenience. Where relevant, we recommend using your own nutrition calculations.
https://abeautifulmess.com/wp-content/uploads/2025/01/focaccia.jpg
2025-02-01 07:45:00