

AWS DocumentDB is a fully managed NoSQL document database service designed for JSON-based workloads. It is compatible with MongoDB and provides high availability, scalability, and security for modern applications.
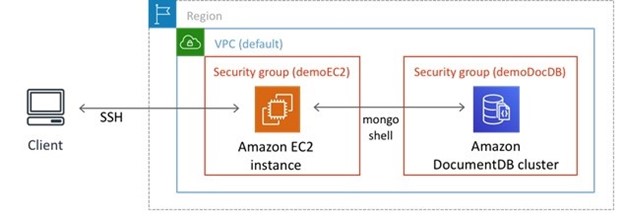
However, direct access to AWS DocumentDB from a local machine is not possible due to its VPC-based architecture. To interact with DocumentDB, we use an Amazon EC2 instance as a bridge, allowing us to securely connect via Mongo Shell.
This guide walks you through the step-by-step process of deploying an AWS DocumentDB instance and accessing it using Mongo Shell from an EC2 instance. By following these steps, you will learn how to:
Step 1: Creating an EC2 Instance
To start, you’ll need to create an EC2 instance in AWS, which will serve as a connection point to your AWS DocumentDB instance. The EC2 instance will act as the gateway for your Mongo Shell.
Instructions:
- Go to the AWS Management Console.
- Navigate to EC2 and click on Launch Instance.
- Select an Amazon Machine Image (AMI), such as Amazon Linux 2 or Ubuntu, depending on your preference.
- Choose an instance type (e.g., t2.micro for free tier users).
- Configure the instance settings, such as VPC, subnet, and assign a public IP if needed.
- Set up security groups that allow SSH access (port 22) from your local machine’s IP address.
Step 2: Creating an AWS DocumentDB Instance in the Same VPC
Once your EC2 instance is ready, you can create a DocumentDB instance in the same VPC to ensure that it can be accessed securely.
Instructions:
- Go to the DocumentDB section in the AWS Management Console.
- Click Create database.
- Choose the instance size and other configurations (e.g., replication, storage).
- Make sure the AWS DocumentDB instance is placed in the same VPC as the EC2 instance.
- Set up security groups for the DocumentDB instance to allow connections from the EC2 instance’s security group (you’ll need the security group ID of the EC2 instance here).
- Take note of the endpoint of your DocumentDB instance, which will be used later in the connection process.
Step 3: Connect to EC2 Using Your Windows Machine (via Terminal)
To SSH into your EC2 instance from your Windows machine, you can use Windows Subsystem for Linux (WSL) or Git Bash. Both options will give you the ability to run the SSH command directly from your terminal.
Using Git Bash:
Install Git Bash:
- If you don’t already have Git Bash installed, you can download it from here.
- Once installed, open Git Bash.
Prepare your PEM key:
- When you created your EC2 instance, you were given a PEM file (key pair) for SSH access. You’ll need to make sure the file has the right permissions.
- Move your PEM file (e.g., my-key.pem) to a directory like C:UsersYourUsernameDocumentskeys.
- Change the permissions of the key file by running the following command inside Git Bash:
chmod 400 /c/Users/YourUsername/Documents/keys/my-key.pem
SSH into EC2:
- In the terminal, use the following command to SSH into your EC2 instance:
ssh -i /c/Users/YourUsername/Documents/keys/my-key.pem ec2-user@<ec2-public-ip>
- Replace <ec2-public-ip> with the actual public IP address of your EC2 instance.
Accept the connection:
- The first time you SSH into the instance, you may be prompted to accept the connection by typing yes.
Once you’ve successfully logged in, you will have terminal access to your EC2 instance.
Using Windows Subsystem for Linux (WSL):
If you’re using WSL, the steps are similar:
Install WSL (if you don’t already have it):
- You can install WSL by following the instructions from Microsoft’s guide.
Use SSH:
- After WSL is installed and set up, open your WSL terminal (Ubuntu or any distribution you’ve installed).
- Use the same SSH command:
ssh -i /mnt/c/Users/YourUsername/Documents/keys/my-key.pem ec2-user@<ec2-public-ip>
Now you’re connected to your EC2 instance directly from your Windows machine via the terminal, bypassing the need for PuTTY.
Step 4: Access DocumentDB and Query Using Mongo Shell
Now that you’re connected to your EC2 instance, the next step is to access the AWS DocumentDB instance through Mongo Shell.
Instructions:
- Install MongoDB tools on your EC2 instance if not already installed by running:
sudo yum install -y mongo-tools
- Use the following Mongo Shell command to connect to your DocumentDB instance (replace docdb-endpoint and port with actual values):
mongo –ssl –host docdb-endpoint –port 27017 –username <your-username> –password <your-password> –authenticationDatabase admin
- Once connected, you can start querying the DocumentDB database using MongoDB commands (e.g., show dbs, use <db>, db.collection.find()).
Conclusion
By following these steps, you will have successfully deployed a AWS DocumentDB instance in AWS and accessed it using Mongo Shell via an EC2 instance. This setup is common in scenarios where direct internet access to your database is not allowed, and EC2 serves as a secure proxy.
If you need further help, you can contact us at info@xavor.com. We will schedule a free consultation session to explore how Xavor can assist you.
[og_img]
2025-03-05 00:55:27